Table of Contents
The Ultimate Guide to Growing Oyster Mushrooms
Growing mushrooms is a rewarding and fascinating experience. Not only because it gives you a sneak peek into the mysterious world of fungi, but you get delicious gourmet mushrooms! For experienced and new mushroom growers alike, Oyster Mushrooms are a popular “go-to”. They are vigorous, versatile, and grow well in a variety of climates. Best of all, they’re delicious and have a growing economic value!
Understand Your Materials and Process
Before you get started with cultivation let’s get a little background into some of the materials and terminology involved in cultivation.
The Basic Mycology Vocabulary Words
- Mushroom Spawn: Spawn is mycelium that is used to “seed” your mushroom onto a substrate.
- Substrate: Substrate is biomass that is usually processed to be used as the bulk food source for your mushroom.
- Pasteurization: This is a process in which 99%of life is removed from a material.
- Inoculation: This is the process in which fungal material is introduced into a new substrate.
- Incubation: Time period where mycelium is growing. This occurs after inoculation and before fruiting.
Materials Needed
- Mushroom Spawn
- Biomass For Substrate
- Plastic Bags + Micropore Tape or Mushroom Grow Bags
- Mesh Bag or Pillow Case
- 70% Alcohol and Rag
- Other cleaning materials like soap, sponge, etc.
- A table will make for easier working space.
- Tape + Permanent Marker (for labeling bags)
- Large Pot or Barrel For High-Temperature Pasteurization
Mushroom Spawn Elaborated
Spawn is one of the most important materials needed to succeed at mushroom cultivation. It may be the only specialty material you need to find. It is with Spawn that you will introduce the mushroom culture of choice into its new food source. This is why Spawn must be healthy, thriving, and extremely clean.
If you attempt to grow mushrooms from low-quality Spawn, you will be more likely to have issues.
Choosing Your Oyster Variety
There exist many different types of Oyster Mushrooms, each with preferential climates and conditions. Consult the table below for ideal temperature ranges. Choose a strain that is best suited for your climate.
| Variety | Temperatures |
|---|---|
| White Oyster | 55-75 F |
| Pink Oyster | 70-80 F |
| Yellow Oyster | 60-75 F |
| King Oyster | 45-55 F |
Step 1: Preparing Your Substrate
Oyster Mushrooms can be grown on a wide range of different materials including hay, straw, coffee grounds, wood shavings, and agricultural wastes. Usually, the best materials are those that can be acquired locally, economically, and are free of potential toxins.
Ideally, your substrate should be made of relatively small and homogenous pieces. When placed in a container they should fill the bag with only minimal airspace between them. In many cases, this means grinding or breaking down your materials.
| Types of Substrates | Preparation | Things to Consider |
|---|---|---|
| Straw | Cut into pieces around 5” in length. You can do this manually with a machete or give it a go with a weed whacker. | Avoid using Hay as it tends to have higher levels of nitrogen and thus leads to contamination. |
| Coffee Grounds | Use as-is. Make sure they are not excessively wet. | Contains high levels of nitrogen that can easily result in contamination. |
| Wood Shavings, Saw Dust, and Wood Chips | Use as-is and avoid mixing woods. Wood Shavings tend to be the best if you have options. | Only use wood materials that originate from hardwoods. This includes Oak, Ash, Maple, Fruit Trees, and other broad-leaf species. |
| Corn Cobs | Grind into small homogenous pieces. Alternatively, you can cut it by hand. | Large pieces tend to leave a lot of room between them and could cause contamination. |
Once your substrate is prepared, put it inside a mesh bag of adequate size. A large pillowcase or laundry bag will also work great. Once you’ve got the substrate in the bag, you are ready to move onto pasteurization!
Step 2: Pasteurization
There are a couple of ways to pasteurize your substrate, the easiest being the Hot Water Bath. The Hot Water Bath
- Heat water in the largest container you can find. This can be a large pot or metal barrel.
- Once boiled, wait until it cools down to 180 degrees F.
- Submerge your substrate for 1 hour making sure temperatures stay between 160-180 degrees F.
- Afterward, carefully remove your substrate and hang it so it can drain/cool. About 3-4 hours.
- Your substrate is dry when it no longer drips when squeezed. Step 3: Inoculation In this step, you will be introducing mushroom spawn into your prepared substrate.
- Prepare your working space. This should preferably be a table but could also be a large tarp or any clean surface. Make sure the surface is free of any dirt and has been sterilized with alcohol.
- Grab your plastic bags or mushroom grow bags and fill the bottom 15% of the bag with the substrate.
- Sprinkle a couple of grams of spawn on top of the substrate. It should form a thin evenly distributed layer. Consider only 5-10% of your grow bag will be spawn.
- Repeat steps 2 and 3 until your bag is almost full. Leave about 15% of the bag empty.
- Either tie a knot or close the bag folding the top and taping it shut.
- If you’re using normal plastic bags make 3 holes in the front and the back evenly spaced. Cover these holes with micropore tape. This will ensure gas exchange and act as a filter.
- Label your bags with tape and a marker. Include strain, the date, and any other details you may need.
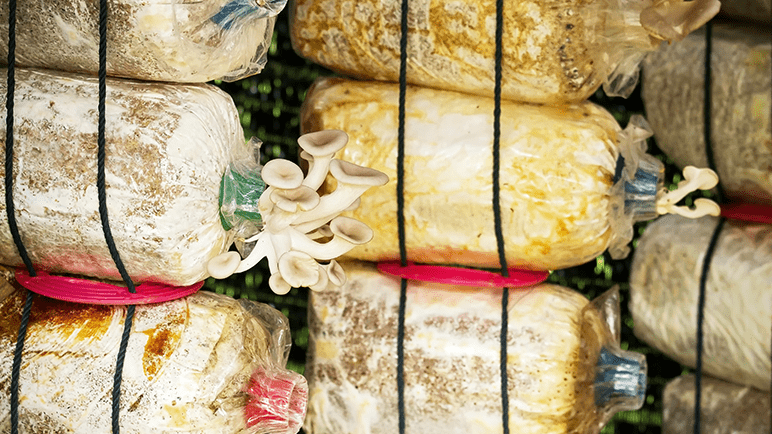
Step 4: Incubation
Now it’s time to let the mycelium grow!
Where to Incubate Your Mycelium?
- Keep Fruiting Blocks in the dark. You can cover them with a dark fabric or in a closed room.
- Keep temperatures as indicated for each species.
- Aim for 50-75%. humidity.
- Most grow kits will only take 3-4 weeks of incubation.
- Ensure there is sufficient gas exchange with the environment. Don’t keep it in a sealed garbage bag or plastic container! Once your bags are completely white and colonized they are ready to fruit. If you begin seeing small fruiting bodies being produced you know it’s the time!
Step 5: Fruiting Your Mushrooms
This is the best part! It’s also the most delicate. Depending on your climate you may need to manipulate your natural environmental conditions.
Best Conditions For Fruiting
- Provide diffused and indirect light for 8-12 hours. This can also be achieved with a dim LED light.
- Keep your humidity above 75%! Ideally, between 90-100%. Humidity can be increased with the help of misters or humidifiers. Alternatively, use a fruiting chamber. Another easy strategy is to place or hang wet fabric around your fruiting area.
- Make sure there is adequate air exchange. Conditions high in CO2 will result in long stems, small caps, and irregular growth.
Step 6: The Harvest
Harvesting is easy! You know your mushrooms are ready once the outer margin of the cap begins to lift. Ideally harvest right before this point! Afterward, cut your mushrooms from the base as close as possible to the substrate. If you have a large cluster don’t be afraid to harvest it all at once.
After your first harvest, you can try to get a second flush. Do this by repeating step 5. You may be able to get 2-3 flushes from the same bag!